
For Men: How To Tie A Tie – Part 3
14. Cafe Knot

Learn how to tie a Cafe Knot:
- Drape the necktie around your collar with the seam facing inward and the thick end on your right, about a half an inch lower than you want the finished tie to hang.
- Cross the thin end over the thick end, forming an X. Then bring the thin end up through the loop you just formed, behind the X.
- Flip the thin end over the top of the knot.
- Bring the thin end behind the knot from left to right.
- Then bring the thin end across the front from right to left.
- Now bring the thin end behind the knot and up through the loop around your neck. This will leave a horizontal band across the front of the knot.
- Flip the thin end over the front of the knot so that it hangs down.
- Bring the thin end slightly to the left of the thick end, then fold it around behind the knot, passing from left to right.
- Bring the thin end up in front of the knot, pointing the tip upward and toward your left shoulder.
- Tuck the thin end through the loop around your collar, behind the rest of the knot and emerging on the left side of the thick end.
- Tug the thin end down firmly and take a moment to arrange the center of the knot. You want the diagonal legs to rise at the same angle, meeting squarely beneath your chin.
- Flip the thick forward and up. You can toss it over one shoulder.
- Turn the thin end point-upward and slip it through the single horizontal loop across the back of the knot.
- Pull the thin end all the way through the loop and snug it up tight.
- Flip the two ends of the tie back down.
- Tighten carefully by holding the knot in one hand while tugging on the thick end with your other.
The Cafe Knot is a difficult one. Don’t try it until you’re very familiar with the basics of how to tie a tie.
15. Eldredge Knot

Learn how to tie an Eldredge Knot:
- Drape the tie around your collar, with the thick end on the right exactly where you want it to hang when the knot is completed.
- Pinch the wide end of the tie to form a dimple and cross the thin end in front of the thick end as horizontally as possible.
- Wrap the thin end around behind the cross-shape, crossing horizontally from right to left.
- Tuck the thin end through the loop around your collar.
- Bring the thin end horizontally across the thick end.
- Tuck the tip of the thin end up through the loop around your collar and flip it over the top of the knot, crossing diagonally downward from left to right. Pull it down snug to form a diagonal band along the right side of the knot.
- Bring the thin end around behind the back of the knot and up through the diagonal band.
- Feed through and pull tight to create a diagonal band on each side.
- Aim the thin end of the tie straight upward, then tuck it down beneath the loop around your collar, emerging to the right of the knot.
- Loop the thin end of the tie up and around the circle around your collar. Leave a little bit of slack in this step.
- Tuck the tip of the thin end down and to the left, underneath the loop around your neck, and up through the loop you just created.
- Flip the thin end over the top of the loop around your collar.
- Tuck the remainder of the thin end out of sight, either behind the thick end or by sliding it horizontally under the loop around your neck. Tighten if needed by pulling the thick end and adjust each diagonal band to roughly the same width.
This is a very complex tie knot that says you REALLY know how to tie a tie… and you’re not afraid to show it off.
16. Trinity Knot

Learn how to tie a Trinity Knot:
- Drape the necktie around your collar with the seam facing inward and the thick end hanging on your right where you want the finished length of the tie to be.
- Cross the narrow end diagonally in front of the thick end, making an X, and tuck it up under the loop around your neck.
- Bring the narrow end back over the top of the loop.
- Pass the narrow end horizontally behind the thick end.
- Flip the narrow end over the top of the loop around your collar.
- Feed the tip of the narrow end down and out underneath the loop around your neck, on the far right side of the knot.
- Bring the narrow end horizontally across the front of the knot from right to left. Slip a finger underneath the horizontal band this creates.
- Bring the narrow end up underneath the loop around your collar and down through the horizontal band. Slide a finger underneath the narrow end just above the knot.
- Pass the narrow end around behind the thick end from right to left.
- Feed the tip of the narrow end up over the loop around your collar and through the small vertical loop you reserved in Step 8.
- Pull the narrow end all the way through the vertical loop, still angling diagonally upward and to your right, and snug it down.
- Pull all the slack out of the knot and adjust as necessary to make the three visible folds identical in size and angle. Hide the narrow end either behind the thick end or under the loop around your collar.
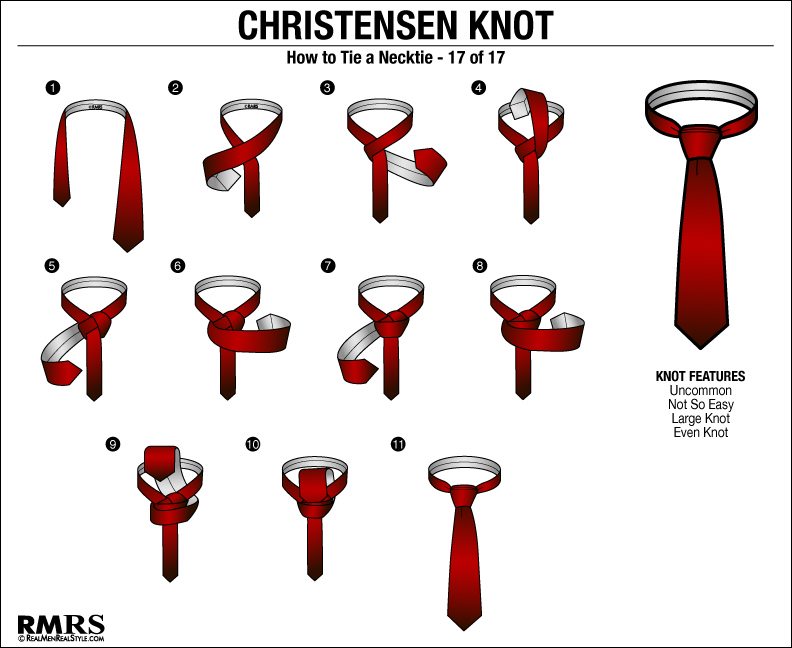
17. Christensen Knot

Learn how to tie a Christensen Knot:
- Drape the necktie around your collar with the thick end on the left. This end should be hanging a good four to six inches lower than the finished length you desire.
- Cross the thick end horizontally in front of the thin end from left to right.
- Bring the thick end around behind the thin end horizontally from right to left.
- Flip the thick end up in front of the loop around your collar.
- Tuck the thick end down behind the loop around your collar, emerging on the right side of the thin end.
- Bring the thick end in front across the earlier horizontal band and the diagonal you created in Step 5. Slip a finger under this new horizontal crossing.
- Bring the thick end around behind the knot from left to right.
- Bring the thick end across the front, right on top of the horizontal fold you made in Step 6. (Your finger should still be holding the fold open.) Keep both horizontal bands held slightly off the collar with a finger.
- Bring the thick end up underneath the loop around your collar.
- Tuck the thick end down behind both of the horizontal crossings and pull through.
- Pull the knot into place by holding the knot with one hand. Now tug gently on the thin end with the other. Use your finger to tease out the diagonal folds until the X shape of the knot is very clear.